
Now that Apple recently released the final iteration of its beta version of macOS Ventura, the official public release is around the corner. It is very exciting to get new features and performance updates with new macOS versions especially with Ventura providing a bunch of useful productivity and convenience features.
There are a couple of ways you can upgrade your Mac to the latest macOS Ventura. But the clean install of macOS Ventura instead of a simple upgrade from previous macOS on your Mac will give you a fresh experience and added advantages that we listed below.
Why to Clean Install macOS Ventura ?
A clean install of macOS Ventura would make sure you get a fresh new start experience, remove redundant apps, clear the hard drive and improve Mac performance considerably.
Below are a few key reasons to clean install macOS Ventura on your Mac.
- Fresh new start, like brand new Mac.
- No redundant applications compatibility issues.
- Better Mac efficiency and improved performance.
- Clean and full Mac hard drive storage available.
- Greater interface responsiveness with better stability.
- Can only install required and compatible applications.
How to Clean Install macOS Ventura on Mac from Bootable USB
Step 1 : Backup your Mac to External Hard Drive or iCloud
It is important that you should backup your Mac data to either external hard drive or to iCloud. A clean install of macOS Ventura will wipe clean your Mac hard drive and lose all your data along.
Backup using TimeMachine to External hard drive
1. Connect the external hard drive to your Mac.
2. Click on ‘Apple menu’ on top of the menu bar and Select ‘System Preferences’ option from dropdown. Then Click on ‘Time Machine’ Option.
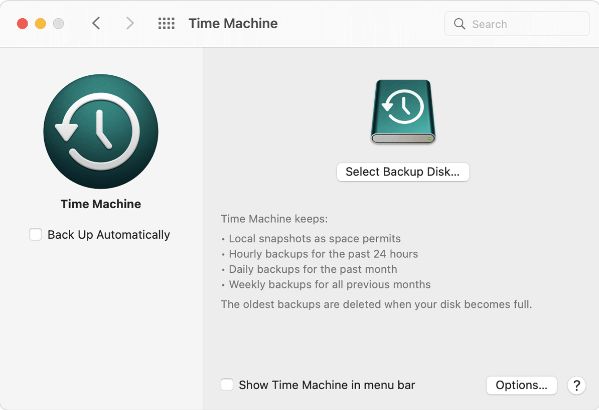
3. Now on the Time Machine window, Click on the ‘Select Backup Disk’ button.
4. Here, Select your External Hard drive and Click on ‘Use Disk’ button.
Backup Mac documents and file on iCloud
1. Click on ‘Apple menu’ on top of the menu bar and Select ‘System Preferences’. Then Click on ‘Apple ID’, and Select ‘iCloud’ option.
2. Check if iCloud Drive is Turned ON, and Click on the ‘Options’ button next to iCloud Drive.
3. Here, Check all the provided options including ‘Desktop & Documents Folders’

4. And finally Click on the ‘Done’ button.
Step 2 : Create Bootable USB of macOS Ventura
1. Since official public version of macOS Ventura is not available right now, download the latest beta version of macOS Ventura onto your Mac.

2. Connect the USB drive to your Mac to create a bootable installer. And note down the name of the USB drive.
3. Now launch Terminal by navigating Finder > Applications.
4. Enter the following command into the Terminal :
“sudo /Applications/Install\ macOS\ 13\Beta.app/Contents/Resources/createinstallmedia –volume /Volumes/MyVolume “.
Replace ‘MyVolume’ in the command with your USB drive name.

5. Once done entering the above command in Terminal, Press the ‘Return’ key on the keyboard. When prompted, enter the admin password and then Press Return again.
6. Again when prompted to confirm to erase the volume, enter ‘Y’ and Press Return key. When copying of the bootable installer is completed, the USB drive will have the same name as the installer downloaded.
Step 3 : Enable Booting from USB on Startup
1. Enter into Recovery Mode on your Mac by Press & Hold Command + R keys, and when prompted provide the password.
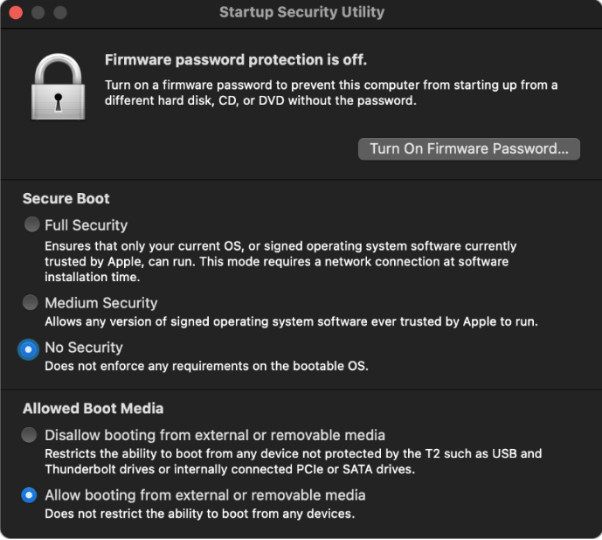
2. On the Recovery Mode Window, Select ‘Utilities’ tab on top and Click on ‘Startup Security Utility’ option.

3. Here, Check the box of both ‘No Security’ and ‘Allow booting from external or removable media’ options. And then Click on the ‘Close’ button to save the changes.
4. Now, Click on the Apple icon and Select Shut down option to turn OFF your Mac.
Step 4 : Boot and Clean Install macOS Ventura
1. Depending on the Mac with M1 or Intel processor follow below steps to select bootable media.
- For M1 processor – Turn ON your Mac and continue to Press and Hold Power button until startup options appear.
- For Intel processor – Turn ON your Mac and immediately Press & Hold the Option key until bootable volumes screen appears.
2. On the new window Select the bootable USB drive and Click ‘Continue’.

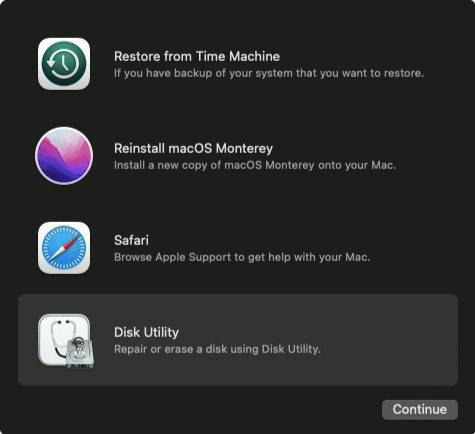
3. Here on the Recovery Mode window, Select on ‘Disk Utility’ and Click on ‘Continue’.
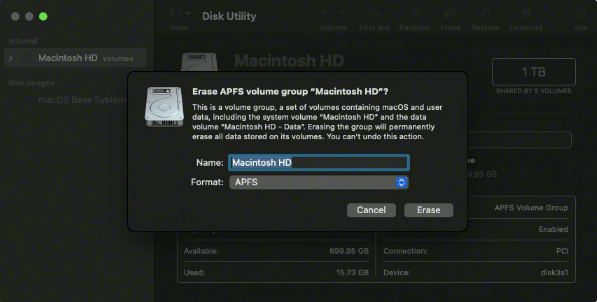
4. Select your Mac internal hard drive and Click ‘Erase’ option from top. When prompted provide name and Select ‘APFS’ as Format. Finally Click on ‘Erase’ Button.
5. Once disk erase is over, Exit from Disk Utility and Select ‘Install macOS 13 beta’ option. Now follow the onscreen instructions to clean install macOS Ventura on your Mac.
When to Clean Install Official Version of macOS Ventura?
The final official release of macOS Ventura is scheduled to be out by fall and in a couple of weeks from now the official release of macOS Ventura will happen. So keep your fingers crossed and wait till the official version is out for the public to consider a clean install on your Mac.
Frequently Asked Questions –
Q1. Should I clean install macOS?
Yes, a clean install of macOS would significantly improve the performance and give you a fresh brand new experience.
Q2. Why do a clean install macOS?
You should consider a clean install of macOS on your Mac to improve performance and many more reasons as mentioned above.
Q3. Does reinstalling macOS wipe everything?
Yes, reinstalling macOS on your Mac will clear all the data on your Mac.
Conclusion
A clean install of macOS Ventura offers a fresh start for your Mac, ensuring optimal performance and stability. By erasing the existing system and applications, you eliminate potential conflicts and enhance overall efficiency.
Following the detailed steps and creating a backup ensures a smooth transition, minimizing data loss risks. This process is particularly beneficial for resolving persistent issues, and with the proper preparation, the clean install becomes a reliable method to revitalize your Mac and embrace the latest macOS features.
Also Read