
Do you want to uninstall Spotify on Mac but are not able to find a solution? Spotify is a great platform to stream music and podcasts, but it can be intrusive for some. There can be various reasons for you to remove Spotify from Mac, be it distracting notifications, large cache files, free trial ended.
Whatever your reason be, we are here to explain how to completely uninstall Spotify from your Mac.
How To Uninstall Spotify From Mac
Since Spotify does not provide native uninstaller button for Mac, you have to manually uninstall it. There are various ways to remove Spotify from Mac manually using built-in utilities.
1. Move to Trash
Easiest way to uninstall applications from Mac is to just move them or drag to Trash in the dock. So, to remove Spotify from Mac follow the below step:
Step 1 – Make sure to Quit Spotify if the application is running.
Step 2 – Go to Finder and select Applications from the sidebar.
Step 3 – Among the list of Applications, locate Spotify and drag it to Trash on the Dock.

Step 4 – Empty the Trash by selecting Empty one item or Empty all option. This will remove the Spotify application from your Mac permanently.
2. Using Terminal on Mac
You can uninstall Spotify from Mac using Terminal with simple and easy commands. All it takes is to type a few commands into the Terminal to delete Spotify without much hassle. Follow below steps to use Terminal to uninstall Spotify manually.
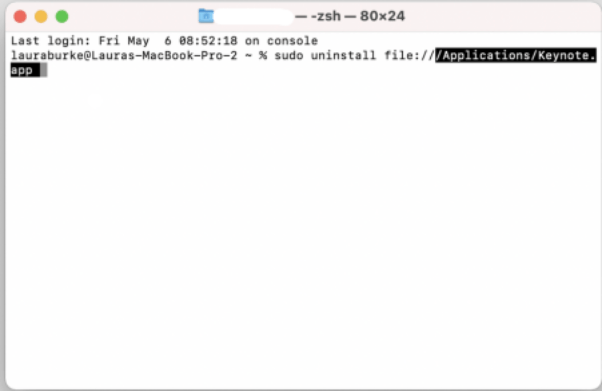
Step 1 – Open Terminal from Finder > Applications > Utilities.
Step 2 – Type “sudo uninstall file:// “ Command into Terminal.
Step 3 – Just simply drag Spotify app icon into Terminal, it will automatically update its path.
Step 4 – Finally Press Enter to execute the command. Provide admin password when prompted.
Remove related files after uninstalling Spotify –
Just by dragging the Spotify app to Trash will only uninstall it, but it will not remove all the related files. Files such as the Library like Preferences, Caches, Application support etc.
These files associated with Spotify need to be removed manually by locating them. Follow the below steps to manually remove related files of Spotify from Mac :
Step 1 – Open Finder window, Click on the Go menu and select Go to Folder.
Step 2 – In the text box, paste each of the following file paths from below one at a time and click Go.
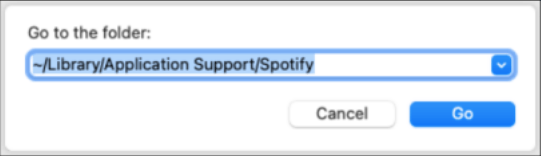
~/Library/Application Support/Spotify
~/Library/Saved Application State/com.Spotify.client.savedState
~/Library/Caches/com.Spotify.installer
~/Library/Caches/com.Spotify.client
~/Library/Preferences/com.Spotify.client.plist
~/Library/Preferences/com.Spotify.helper.plist
~/Library/LaunchAgents/com.Spotify.webhelper.plist
Step 3 – After deleting each of these related files from Spotify, do make sure to empty the Trash again.
Now you have completely removed every associated file of Spotify after uninstallation. This will make sure that all the app traces are removed along with the application.
3. Uninstall Spotify From Your Mac Using CleanMyMac X
The easiest way to remove Spotify from Mac is using the CleanMyMac X. This application does the most heavy lifting for you, completing all the manual labour by itself on a click of a button.
Its Uninstaller Module can completely uninstall Spotify safely and removes all its associated files from the Library to improve Mac performance significantly.
Follow these steps to delete Spotify app on Mac easily :
Step 1 – Download and install CleanMyMac X application from here.
Step 2 – Launch it and select Uninstaller Module from the left side panel.
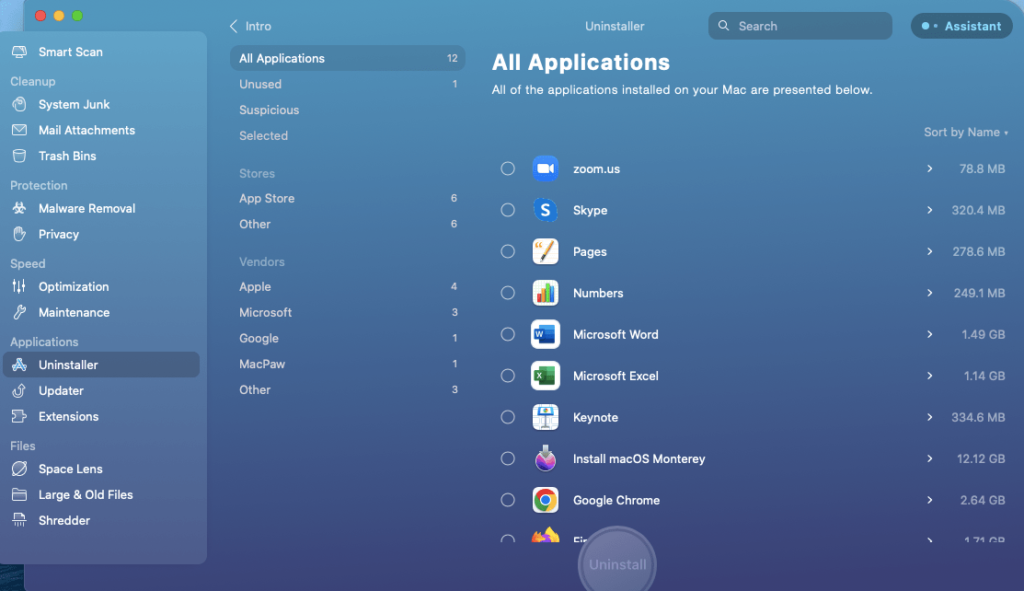
Step 3 – Browser through the apps to find Spotify or search for it in the search box.
Step 4 – Select the check box next to it and Press Uninstall.
CleanMyMac X is the best uninstaller for mac and remove all the related files without manually deleting them all from the Library.
How To Delete Spotify Cache ?
But if you don’t intend to uninstall Spotify from your Mac, instead want to just clear up space hogging by application cache files then read on.
Over a period of time using the application creates large chunks of cache files which hamper the performance. There are various ways to delete cache files without corrupting the Spotify application running both manually and using CleanMyMac X, although depending on the internet speed the performance might be affected a fair bit.
A. One possible way is to delete them manually just like we did it above.
Follow these steps for it :
Step 1 – Open Finder window, Click on the Go menu and select Go to Folder.
Step 2 – In the text box, type this file path “ ~/Library/Application Support/Spotify/PersistentCache/Storage “ and delete all the cache content.

Step 3 – Make sure to empty the Trash to retrieve the space completely.
B. Another manual way is to set the exact size for Spotify to store cache. This will limit the total cache size that Spotify can store and will maintain it.
Follow the below steps to set the limit :
Step 1 – Quit Spotify application if it’s running.
Step 2 – Open Finder window, Click on the Go menu and select Go to Folder.
Step 3 – Type in this file path into the box “ ~/Library/Application Support/Spotify/prefs “ .
Step 4 – Locate the prefs file and right click on it to open in Text Edit.
Step 5 – Scroll to the bottom of the document and paste the following text in the new line: “ storage.size=1024” (Can choose lower ‘512’ MB size also).
Step 6 – Then Save the file before closing it.
Doing these steps will significantly reduce the cache size to the specified limit by you.
C. You can also do another easy way to limit cache is by reducing the music streaming quality set low or normal. Follow these steps to do the same :
Step 1 – Launch the Spotify application on your Mac.
Step 2 – Open Spotify menu and select Preferences.
Step 3 – Scroll down to locate the Music Quality section.
Step 4 – Select the dropdown menu and choose between Low or Normal.

Now your music streaming is set to normal quality which will reduce the Spotify cache extremely low.
D. If you don’t want to do it manually then there is always the easiest way to delete Spotify Cache using the CleanMyMac X application, which will safely and securely remove all the accumulated cache files with just a click on a couple of buttons.
Follow below steps to remove Spotify cache easily :
Step 1 – Download and install CleanMyMac X application from here.
Step 2 – Launch the Application and select System Junk Module from the side bar then press Scan.
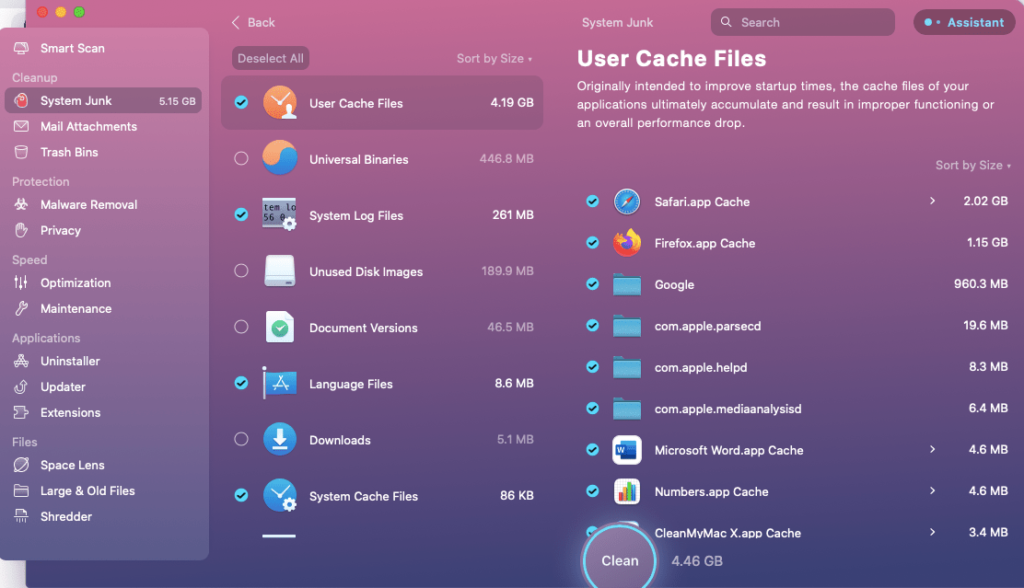
Step 3 – After Scan is complete , select the Spotify app Cache from the list and press Clean to remove easily.
CleanMyMac X will remove all the unwanted cache stored over time by Spotify safe and easy without hampering smooth running.
Note: Important to note here is that while using Spotify the cache will pile up again, so make sure to perform one of the above steps to remove them periodically to aid its performance.
4. Spotify won’t uninstall – how to fix this issue
Sometimes, due to various errors Spotify application refuses to uninstall. It might happen even after moving the app to Trash. If you find the Spotify related files or icons and see it launch after reboot, then it is advised to repeat the above steps.
If nothing works, there is another easy way to reset the application using CleanMyMac X to fix the corrupted files.
To reset Spotify application via CleanMyMac X Uninstaller Module follow the below steps:
Step 1 – Download and install CleanMyMac X application from here.
Step 2 – Launch the Application and select Uninstaller Module from the side bar.
Step 3 – Select View All Applications and locate the Spotify app in the list.
Step 4 – Select the Spotify App and from the dropdown next to its name select the Reset button.
Step 5 – Press the Reset and wait till it fixes the issues.
Once CleanMyMac X resets the Spotify app, follow through above mentioned uninstallation methods. Now it will uninstall Spotify from Mac without any troubles and remove its associated files completely from Mac.
Frequently asked questions
Q1. Why can’t I uninstall Spotify on Mac?
More than often it happens due to corrupted files or outdated software it is harder to uninstall Spotify on Mac. Go through the aforementioned steps to remove Spotify from your Mac. Also learn how to delete all its related files from the Library.
Q2. How do I completely uninstall Spotify?
You can completely uninstall Spotify from your Mac using manual or automatic methods using third party tools.
Q3. How do I uninstall Spotify on my Mac Catalina?
It is very easy to uninstall Spotify on Mac Catalina, drag the Spotify app from the Applications folder to Trash in the dock. This will remove Spotify from your Mac but you have
to delete all its associated files from the Library manually. Use the CleanMyMac X to uninstall Spotify from your Mac along with its associated files from Catalina easily.
Q4. How do I uninstall and reinstall Spotify?
To uninstall Spotify from your Mac, read the methods in this blog – manual and third party application. It will uninstall Spotify completely and then you can reinstall Spotify from its official website. This will help in removing any errors and glitches caused by cache files.
Conclusion
In conclusion, removing Spotify from your Mac is a simple process that can free up space and declutter your system. By following the steps outlined in this guide, you can easily uninstall Spotify and its associated files, ensuring a clean removal.
Remember that you can always reinstall Spotify later if you change your mind. Whether you’re looking to switch to another music streaming service or need to troubleshoot issues, uninstalling Spotify can be done quickly and hassle-free.
We suggest using a Mac cleaner to clear the storage space regularly on your Mac for optimal performance.
Also Read