Seamlessly transferring files between your iPhone and Mac is essential for efficient data management. Whether it’s photos, documents, or media files, having a reliable method ensures a smooth workflow.
In this guide, we’ll explore various techniques, including Apple’s native solutions like AirDrop and iCloud, as well as third-party apps, providing you with versatile options to suit your preferences. Enhance your digital experience by mastering the art of file transfer between your iPhone and Mac, fostering a more connected and organized approach to handling your data.
We have provided five easy methods in this blog that you can try to transfer files between these two devices
How to Transfer Files Between iPhone and Mac
Since both iPhone and Mac are from the same Apple ecosystem, it is relatively easy to transfer files between them. But choosing the right method for the right file type you want to transfer between your iPhone and Mac makes all the difference. So below are easy methods for you to try for transferring files between iPhone and Mac securely.
Method 1 : Using iTunes File Sharing
The most common way to transfer the files between iPhone and Mac is by using iTunes File Sharing feature.
You can share audio & video files, Photos, contacts, calendars between iPhone and Mac, you can also share files between your iPhone and Mac using other apps which support file sharing just like iTunes.
Follow below steps to transfer files :
1. Connect your iPhone to your Mac using a USB cable.
2. Now launch the iTunes app on your Mac, and click on your device icon on the top left corner of the iTunes app window.

3. Click on File Sharing from the left sidebar menu of the iTunes window.

4. Select the app you want to transfer files between from the list.
5. Now you can start transferring files between iPhone and Mac :
- To copy files from your Mac to iPhone : Click on ‘Add’ button at the bottom to select the file you want to transfer from Mac and then Click ‘Add’ option.
- To copy files from your iPhone to Mac : Click on the file you want to transfer from the list on the right under the app, Click on ‘Save to’ Option at the bottom to Select the location on your Mac to transfer the file. Later Click on the ‘Save to’ button to transfer.
Method 2 : Using AirDrop
To transfer files between Apple devices wirelessly, it provides a built-in file sharing utility called AirDrop. It allows you to transfer files between iPhone and Mac wirelessly over bluetooth or WiFi connections.
You can wirelessly transfer documents, photos, videos, man locations and many more between iPhone and Mac easily. Below steps are to transfer files using AirDrop utility :
1. Turn On AirDrop on your iPhone :
a. Make sure both Bluetooth and Wi-Fi are turned on.
b. Open AirDrop app on your iPhone and enable your iPhone to be discovered by either ‘Contacts’ only or ‘Everyone’.
2. Turn on AirDrop on your Mac :
a. Make sure both Bluetooth and Wi-Fi are turned on.
b. Go to Finder and Select AirDrop from the left sidebar. And enable option ‘Allow to be discovered by’ either ‘Everyone’ or ‘Contacts Only’.
3. Now to transfer files between iPhone and Mac :
a. To copy files from your Mac to iPhone : On the AirDrop window you can see your iPhone use benign shown, simple drag and drop the file or files you want to transfer on to the recipient i.e your iPhone.

b. To copy files from your iPhone to Mac : Open the app from where you want to transfer the file, tab on Share button and then Tab on AirDrop option.From the option of recipient tab on your Mac to transfer the file.

Method 3 : Using iCloud Drive
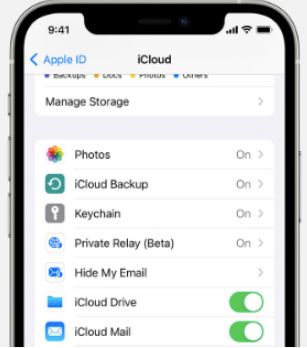
iCloud is a cloud storage platform provided by Apple for all devices including Mac, Windows and iOS. Now you can easily sync all your files to iCloud Drive from your iPhone or Mac and access it from everywhere with the same Apple ID.
Step to sync iCloud Drive on your iPhone and Mac :
1. Sign in to iCloud with same Apple ID from your iPhone and Mac :
a. On Mac – Select Apple menu on top, Click on System Preferences, then Select iCloud. And later select iCloud Drive.

b. On iPhone – Open Settings app and tab on your name, Tap on iCloud and then Enable iCloud Drive.

2. Now simply upload the file you want to transfer from either Mac or iPhone to iCloud Drive.
3. Later download the file you want to transfer on your Mac or iPhone from iCloud Drive.
Method 4 : Via Email
The oldest trick in the file transfer book is to through Email. If your transfer file is not big in size and can be accommodated in an email attachment, then transferring files between iPhone and Mac can be done through Email.
1. To transfer files from your Mac to iPhone, create an email with the files you want to transfer as email attachments and then send it to your own email account.
2. Now open the email from your iPhone and simply download the attachments onto your iPhone.
3. Repeat the same process viceversa from iPhone to Mac.
Only follow this method if the files you want to transfer are smaller in size and in limited numbers to do it quickly.
Method 5 : By Syncing via USB cable
Finally you can transfer files from iPhone to Mac and from Mac to iPhone by connecting iPhone to your Mac using USB cable.
On macOS Catalina and over you can simply connect your iPhone to your Mac and transfer files by syncing.
Steps to transfer files between iPhone and Mac via USB cable :
1. Connect your iPhone to your Mac using a USB cable.
2. Go to Finder and Select your iPhone from the left sidebar menu under Locations section.

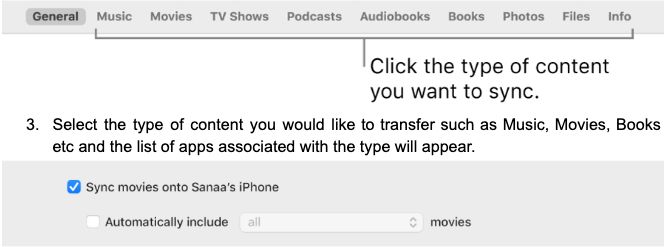
3. Select the type of content you would like to transfer such as Music, Movies, Books etc and the list of apps associated with the type will appear.

4. Now select the ‘Sync [content type] onto [iphone name]’ checkbox to enable syncing action for that type. Follow this for all types of content you want to transfer files.
5. Finally after enabling sync functionality for all content types, Click on Apply button at bottom.
Steps to sync your iPhone and Mac over Wi-Fi connection :
1. Connect your iPhone to your Mac using a USB cable.
2. Select your iPhone under the Locations section from Finder on your Mac.

3. Click on the General tab on the top.

4. Now Select the Checkbox of ‘Show this iphone when on WiFi’ option.

5. Use the button bar to enable and Select Sync settings.
6. Finally Click on the Apply button.
7. Here on, each time your iPhone and Mac are connected to the same WiFi, your iPhone can be selected from the sidebar of the Finder and sync the files you want to transfer.

Frequently Asked Questions –
Q1. How do I transfer files from iPhone to Mac wirelessly?
You can transfer files wirelessly either by using AirDrop or by connecting them both to the same Wi-Fi and then enabling Sync functionality. You can find steps for both these methods above.
Q2. How do I transfer files from iPhone to Mac using USB?
You need to connect your iPhone to Mac using a USB cable and then go to Finder to locate your iPhone under the locations section. Then select the file type you want to transfer from above and choose the app you want to transfer.
Find the full detailed steps to follow above to transfer files using USB Cable.
Q3. How do I transfer files from iPhone to Mac fast?
The fastest way to transfer files from your iPhone and Mac is either through USB cable or AirDrop method, depending on the file size and type.
Q4. Can you AirDrop from iPhone to a Mac?
Yes, you can transfer files through AirDrop from iPhone to a Mac easily over bluetooth and WiFi, follow above given steps to AirDrop from iPhone to Mac.
Conclusion
Effortlessly transferring files between your iPhone and Mac enhances convenience and ensures seamless data management. Whether using AirDrop, iCloud, or third-party apps, the diverse methods discussed in this guide cater to various preferences and needs.
By adopting these efficient file transfer techniques, you can streamline your workflow, back up crucial data, and enjoy a more connected and synchronized digital experience between your iPhone and Mac. Stay organized and simplify your data-sharing process with these user-friendly methods, ensuring a harmonious integration of your Apple devices.
Also Read

